< Previous | Contents (GEM) | Contents (DOS+) | Next >
6 OUTPUT GUIDE
6.1 Introduction
This Output Guide describes the functions and use of the GEM Output System. From the Output System, documents can be printed, displayed on the screen, or sent to a plotter.
The Output System allows you to create a list of documents to be output (an OUTPUT LIST), and to select printing OPTIONS which control the way in which documents are printed or displayed. Both output lists and sets of options can be saved and recalled later for repeated use.
All Output commands are selected from the menus. This Guide deals first with the possible output devices, then with the output lists and option selection, and finally reviews the menu commands.
6.2 Connecting Output Devices to the Microcomputer
Output of text or graphic documents to the screen is always available as an option. Documents can also be sent to a printer or plotter to produce a permanent copy on paper if you have these devices. Check that the printer and/or plotter is correctly connected before sending documents to it.
6.2.1 Printer
A printer for use with GEM must be an Epson FX80 or Epson-compatible printer with a parallel interface. (It is possible to run a printer on serial interface; contact an Acorn dealer for details.) Push the plug on the printer cable into the socket labelled Printer on the underside of the microcomputer. Align the projection on the plug with the notch in the socket; the plug will only fit one way. Ensure that the securing arms clip across the back of the plug.
6.2.2 Plotter
It is possible to run a plotter from the Master Series BBC microcomputer, but this is not supplied or supported as standard; contact an Acorn dealer for advice.
6.3 Entering the Output System
Entry into the Output System is by selection of the menu command To Output from the File menu in one of the GEM applications or the Desktop.
Starting from the Desktop, an empty output list will be displayed on the Output screen.
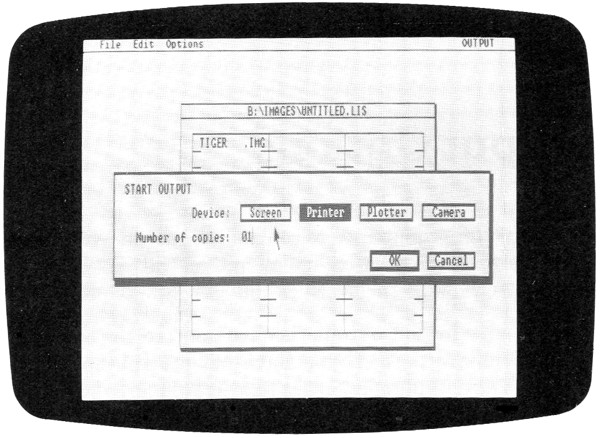
Starting from one of the applications, an untitled output list is displayed with the document currently in use as the only entry. The Start Output . . . dialogue is superimposed over the list, allowing output to begin immediately. The Output screen is illustrated below.
 |
6.4 Output Lists
An OUTPUT LIST is a list of documents to be sent to the printer, screen or plotter. The list has thirty-six lines to hold document names, but is subject to a maximum of 128 characters in total. In effect, this means that fewer than thirty-six names can be included; the exact number will depend upon the length of the document names.
Names are added to the output list, and existing names are deleted or duplicated, using commands in the File menu. Only documents of certain types can be included in an output list; they must have one of the suffixes .GEM, .DOC or .IMG. Documents with the suffix .GEM are automatically created – a .GEM document is created for each .IMG document produced in Paint.
An output list can be used to print or display documents immediately, and can also be saved and recalled at a later date for editing and use. A new output list is saved using the command in the File menu, supplying a name up to eight characters long and with the suffix .LIS. A previously saved list can be saved again under the same name with the command in the File menu.
A previously saved output list can be recalled using the command in the File menu.
6.5 Output Options
The Options menu offers commands to control the way in which documents are presented. For example, the position of a picture on the paper can be controlled, or the speed at which images are sent to the screen.
When the documents in the output list are sent to an output device, the currently set options are used. If you have not set any options, the default options are used. (The default options are those automatically set when GEM is started.) The same options are used for all the documents in the output list. To set different options for each document, it is necessary to create a separate output list for each.
A series of options can be saved using the command in the File menu. The options are saved in a document with the suffix .OPT. A previously saved set of options can be recalled with the command in the File menu.
The default options can be altered to a set of specially selected options. To make a set of options the default, use the command in the Options menu. These options will then be used automatically every time GEM is started, although it remains possible to select different options or saved sets of options within each session.
Documents with the suffix .OPT are stored in the GEMSYS folder. To delete option documents you no longer require, open the folder from the Desktop and delete the unwanted documents. If you have changed the default options, and want to restore the original defaults, open the folder from the Desktop and delete the document. The original defaults will be restored.
6.6 Menu Commands
6.6.1 File
The File menu offers the following commands:
– begins a new output list. If the currently displayed list is new or has been edited and not saved, a warning message is issued, as beginning a new list would delete the present one.
– opens a previously saved output list. The item selector appears; click on the required document name. Use the slider and scroll bars if necessary to move through the directory, or click on the close box of the item selector and open other folders to select a document in another directory. Alternatively, type the directory path of the document, and either click on the document name or type it on the selection line. The directory displayed when the item selector first appears will be that open in the application used before entering Output, or that displayed on the Desktop. If a new or edited output list is already open, a warning message is issued before the item selector appears, as opening another list would delete the present one. The document selected must have the suffix .LIS.
– closes the list currently on the screen and does not display another list. A warning message is issued if the current list is new or has been edited since it was last saved.
– saves the currently displayed output list under the same name. This command is not available if no list or a new list is displayed.
– saves the currently displayed list under a name supplied to the item selector. The name may have up to eight characters, and must have the suffix .LIS – if a name without a suffix or with a different suffix is supplied, a warning is issued.
– retrieves a previously saved set of options. The item selector appears; the document selected must have the suffix .OPT.
– saves the current options under a name supplied to the item selector. The name may have up to eight characters and must have the suffix .OPT – if a name without a suffix or with a different suffix is supplied, a warning is issued.
– allows documents to be sent to the printer, plotter or screen. The following dialogue appears:
START OUTPUT
| Device: | Screen | Printer | Plotter | Camera | ||||
| Number of copies: | 01| |
|||||||
| OK | Cancel |
The camera is not currently available as an output device.
The highlighted device is that currently selected. If necessary, use the DELETE key to delete the number in the Number of copies line and type in the required number Output will begin as soon as you click on or press the RETURN key. All items in the output list will be printed or displayed, using the currently selected options. If items are sent to the printer, a dialogue reports the progress of printing, counting down the documents and copies printed. Press the ESCAPE key to abandon output at the end of the current page.
– leaves the Output System and returns to the application from which the Output System was accessed, or to the Desktop.
6.6.2 Edit
The Edit menu offers the following commands:
and require that an item on the list is selected; if none is selected, these commands are not available. To select a name, click on it once. To select several names, drag from the first to the last name. Selected names are highlighted.
– adds a name to the output list. The item selector is displayed. If there are no other documents in the list, a document may be selected from another directory by using the close box and opening other folders, or by deleting the current directory path and typing the directory path of the required document. If there are already other entries in the list, however, the next document must be selected from the same directory. If it is not, a message will be issued, and the document will not be added to the list. Only documents with the suffix .GEM, .IMG or .DOC may be added.
– duplicates the selected name in the list. The document will then be printed or displayed twice.
– removes the selected name(s) from the list.
6.6.3 Options
The Options menu offers the following commands:
The camera is not currently available as an output device.
– allows options to be set controlling the display of documents output to the screen. The following dialogue is displayed.
SCREEN OPTIONS
| Seconds |
|||||||
| Wait for: | Key | 2 | 5 | 10 | 20 | ||
| Cycle: |
No | Yes | |||||
| OK | Cancel | ||||||
The Wait for option allows you to choose the time delay between documents sent to the screen. This may be a number of seconds (, , , ) or until a key is pressed (). Any key can be used, except ↑ , which displays the previous picture, and ESCAPE which aborts the output sequence. Press the ESCAPE key at any time to interrupt output to the screen.
– allows options to be set controlling the presentation of printed documents. The following dialogue is displayed:
PRINTER OPTIONS
| Scale: | Full Scale | Best Fit | ||||
| Initial Form Feed: | Yes | No | ||||
| Final Form Feed: | Yes | No | ||||
| Horizontal Justification: | Left | Center | Right | |||
| Vertical Justification: | Top | Center | Bottom | |||
| Print in Background: |
Yes | No | ||||
| OK | Cancel | |||||
prints the picture or text at full size, taking several sheets of paper if necessary. (This option can ony be used with continuous form feed paper if documents cover more than one sheet.)
reduces the size of the picture to fit it onto a single sheet of paper.
The Initial Form Feed setting controls whether the printer advances by one sheet of paper before beginning to print each document.
The Final Form Feed setting controls whether the printer advances by one sheet of paper after printing each document.
The Horizontal Justification setting controls the horizontal alignment of the document on the paper.
The Vertical Justification setting controls the vertical alignment of the document on the paper.
The Print in Background setting controls whether the GEM applications and Desktop are available for use while the printer operates. Background printing requires 320 Kilobytes of Random Access Memory (320K RAM); check the capacity of the system before selecting this option.
– sets the present selection of options as the default. To restore the original default options after replacing them, open the folder from the Desktop and delete the icon for the document .
6.6.4 OUTPUT
The OUTPUT menu offers the following commands:
– displays copyright and other information about the Output System; not all of this applies to the Acorn version of GEM.
– takes a snapshot of part of the screen and saves it, giving it the document type .IMG. Details of how to use the Snapshot facility are given in Paint, 3.6.7.
– superimposes the calculator over the window. Instructions on using the calculator are given in 2.13.1.
– superimposes the clock over the window. Instructions on setting the clock are given in 2.13.2.
– displays the print spooler list, allowing document names to be added to or deleted from the list for immediate printing. To add a name, click on the box and the item selector appears; select a document to be added (it must be a text document with the suffix .DOC). To delete a name, click on the name and then on the box. Click on its close box to remove the spooler list. Items added to the print spooler list are printed immediately in draft form (i.e. without special text attributes). Printing is interrupted while the item selector is displayed, but recommences as soon as it is removed from the screen. The Desktop and applications can be used while printing continues.