< Previous | Contents (GEM) | Contents (DOS+) | Next >
5 GEM DESKTOP
5.1 Introduction
GEM Desktop is an administrative and filing system. It allows you to move, copy and delete documents or folders easily, and to store your documents in a useful and logical order.
To take full advantage of the facilities offered by the GEM package, it is necessary to form a structured filing system. You can either design a filing structure before creating documents and then give new documents names which will slot them directly into the right place, or you can create a filing structure and move existing documents into it. The first parts of this section are concerned with organising and creating a filing system. This includes an example you can re-create.
The list or display of the contents of a folder which appears on the Desktop or in the item selector is called a DIRECTORY. Using the commands in the Desktop menus, you can control the way in which the Desktop displays directories and choose the icons it uses.
5.2 Directory Paths
The filing and adminstrative system offered by GEM is equivalent to a conventional office filing system. The elements of GEM's filing system are the folder and the document (see 2.6). These are arranged inside each other to form a structure of folders, culminating in the final document. This enables documents (and folders) to be grouped according to their subject matter or contents.
Each folder has a name; within a directory this name is sufficient to identify the folder. However, in order to represent the location of a document or folder within the whole filing system, it is necessary to supply the names of all the folders which must be opened to find it. This series of folders is called the DIRECTORY PATH. The full name of a document includes the directory path. The first element of a directory path name is a letter identifying the disc drive to be used; this is followed by a colon (e.g. B:). The folder names are given in the order in which they must be opened, starting with the outermost folder. The elements of the directory path name are separated by backslash characters ( \ ). The following is an example of a document name including the directory path name.
Example:
B:\SALES\EAST\JONES\SAL1.DOC
The parts of this name are:
B:\ – the disc drive holding the disc from which the information was read. The folders displayed when you click on a disc drive icon are in the ROOT DIRECTORY.
SALES\EAST\JONES\ – the directory path name; the folder JONES is held inside the folder EAST which is stored inside the folder SALES. SALES is in the root directory.
SAL1.DOC – the document name, including the suffix .DOC which indicates that it is a text document and was created using GEM Write.
Folders are frequently arranged in a tree-like structure; one folder will contain several others, each of these containing further series of folders. The directory path name maps out the route which must be taken through the structure to find a document. The document in the example above might be part of a directory structure like this:
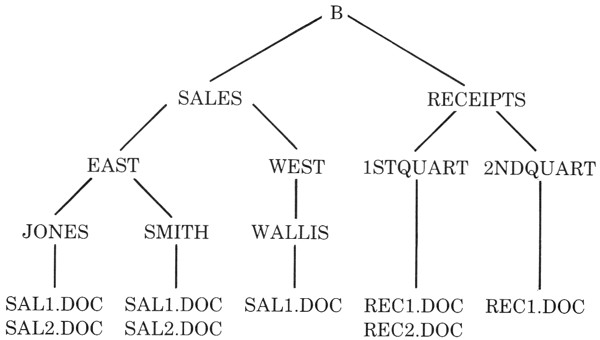
Note that two or more documents may have the same name as long as they are not in the same directory.
To achieve the directory path illustrated you would need to create nine new folders. The creation of new folders is described in 5.3. You could either write the documents and supply their full directory path names to the item selector when saving them, or give each document a different name and copy them into the appropriate folders later from the Desktop. The first is the better method, but the second can be used to incorporate existing documents into a new filing structure. To supply a full directory path name to the item selector, move the pointer to the line displaying the directory path name and click. Then use the DELETE key to delete elements of the path name which do not coincide with the name of the new document, and type the remainder of its directory path name. Press the RETURN key, and type the document name and suffix on the Selection line. Alternatively, click on the item selector's close box to move back through the directory path, and then click on each folder in the directory path of the new document until the correct position in the filing system is reached. Type the document name in the selection line.
5.3 Creating a New Folder
To create a new folder, double-click on the icon. A dialogue will be displayed allowing you to name the folder. Type a name of up to eight characters in the editable text field, adding a three-character suffix if you want. The suffix is not necessary, but might be helpful if the folder is to contain only one type of document. After naming the folder, click on and the dialogue will disappear; an icon for the newly created folder will be displayed on the Desktop, with its name printed beneath.
Documents or other folders can now be added to this folder.
If you try to give the new folder the same name as an existing folder in the same directory, a dialogue will ask either for an alternative name or for the command to be abandoned.
Example:
To create the directory path illustrated in 5.2, follow these stages:
Click on the close box until the disc icons are displayed, then double-click on disc – this displays the root directory.
Create a new folder and give it the name SALES.
Create another new folder and give it the name RECEIPTS.
Double-click on the icon to open the new folder. The folder is empty, but the icon is present to allow you to create more folders inside this one.
Create two new folders, called EAST and WEST.
Open and create two new folders, called JONES and SMITH. Click on the close box; this returns the SALES directory.
Open and create a new folder, called WALLIS.
Click on the close box to return the SALES directory and again to return the root directory.
Open and create two new folders called 1STQUART and 2NDQUART.
Move through the directory path opening and closing folders to check that the structure is correct.
5.4 Copying Folders and Documents
If you have already created some documents using Paint or Write, use these to experiment with the techniques described here.
To copy an item, drag its icon to the destination icon. When you begin to drag an item, the pointer changes to a hand; the hand must be directly over the destination icon when you release the mouse button. To check that the copy operation works, open a newly created empty folder (not one from the example). The window which appears should contain only the icon, as the folder just created is empty. Click on the close box to return to the previous window, and drag one of the other icons onto the icon of this folder. Unless Confirm Copies is set to (see 5.5.2), the COPY dialogue is displayed:
COPY FOLDERS / ITEMS
Folders to Copy:__________ <number>
Items to Copy:__________ <number>
(The number of folders and items represented by the dragged icon is reported.)
When more than one item or folder is being copied, the dialogue constantly reports how many remain to be copied, counting down as copying progresses. Click on to start copying.
When the dialogue disappears, open the new folder again; this time the copied icon appears in the new window.
Several items can be copied at once. Hold down the SHIFT key on the keyboard, or the righthand button on the mouse, and click on all the items to be copied. Without releasing the lefthand button on the mouse after the final shift-click, drag to the destination icon. The COPY dialogue appears and will report the progress of the copying operation.
To make a duplicate of a folder or document without adding it to another folder, release the mouse button at the end of the drag over a blank area of the Desktop. It is necessary to supply a name for the new copy as two items of the same name cannot exist in the same directory. Try copying the newly created folder to a blank area. The following dialogue will appear:
NAME CONFLICT DURING COPY
Current Name: <name of folder>
Copy's Name: |________.___
Type a name for the new copy of the folder and click on or press the RETURN key. After the dialogue disappears, the new folder is visible on the Desktop. Open it to check that everything you added to the folder has also been copied to the new copy of it. Open the original version to check that copying does not alter the original.
Copying an item to a disc icon saves the item on that disc. It will not be added to any folders, and will appear in the first window displayed when the disc icon is opened (the root directory). Copying a disc icon to another disc icon adds the data from the first disc to the second disc (if there is sufficient space free on the disc). Copying a disc icon to a blank area of the Desktop will not alone set up another disc drive; the procedure must be used to set up the Desktop for an additional disc drive (see 5.5.2).
Example:
Experiment with the capabilities of the Desktop by copying documents into the filing structure created in the example. Use both windows and copy documents between the two.
Any documents you have already created are probably stored in one of the folders DOCUMENTS or IMAGES. Open one of these folders to display its contents. Then open one of the folders , , , or in the other window. Drag or shift-click and drag to copy items from the or folder to the empty folder. Open other folders in the structure and copy documents into them. You can delete the original copies from DOCUMENTS or IMAGES later using the Delete command in the File menu (see 5.5.1).
5.5 Menu Commands
Many of the menu commands available from the menus on the Desktop are concerned with maintenance, administration and display of the filing system. Others are more general, such as those in the File menu and the accessories in the DESKTOP menu, which are common also to Paint and Write.
Some of the menu commands can also be invoked by using combinations of keystrokes. In the screen menus and the following lists of commands, the keystroke equivalents are given to the right of the menu commands. On the screen menus, the diamond symbol indicates that the COPY key must be held down while the other key is pressed.
Some menu commands require an icon or group of icons to be selected. The commands appear in faint type and are unavailable unless an icon or group of icons of the correct type is selected.
5.5.1 File
The File menu offers the following commands:
| Keystroke equivalent | ||
| Open | ||
| Info/Rename . . . | COPY I | |
| Delete . . . | COPY D | |
| Format . . . | ||
| To Output | ||
| Exit to DOS |
– opens the selected disc, folder, application or document. If a disc or folder is selected, displays a directory of its contents. If an application is selected, runs the application.
– displays information about the selected item. For example, if the selected item is a folder, its name, its date of creation, details of its contents and the number of bytes used by it are reported. (A BYTE is a unit of computer memory storage.) To rename a folder, click on the name, use the DELETE key to remove all or part of the name, type in a new name and click on or press RETURN.
– deletes the selected item or group of items. Deletion is permanent; deleted items cannot be restored. You can select whether or not GEM asks for confirmation before proceeding with deletion; the default action (i.e. that which it takes if the setting is not altered) is NOT to ask for confirmation. To change the setting, use the command in the Options menu (see 5.5.2).
– formats the disc in drive B: (the second drive). A warning dialogue asks for confirmation, as formatting destroys all data on the disc.
– enters the Output system ready for printing, or displaying documents on the screen. The options available within the Output system are described in the Output Guide, Section 6 of this manual.
– leaves the GEM software suite and returns to the operating system. An A> prompt will appear. To re-enter GEM, press the red function key f0 or type GEM and press the RETURN key. To leave DOS and return to the BBC Master Series bypassing the Tube, type NOTUBE and press the RETURN key.
5.5.2 Options
The Options menu offers the following commands:
| Keyboard equivalent | ||
| Install Disk Drive . . . | ||
| Configure Application . . . | COPY A | |
| Set Preferences . . . | ||
| Save Desktop | COPY V | |
| Enter DOS Commands | COPY C |
Some of these commands require an item to be selected; they appear in faint type and are unavailable unless an item of the appropriate sort is selected.
– allows an additional disc drive to be installed, the description of an existing disc drive to be modified, or a disc drive to be removed. A disc icon must be selected. To add an additional disc drive, copy one of the disc icons and select the copy; to alter the description of a drive already represented on the Desktop, select its icon. A dialogue is issued when this command is selected; in this example, the icon for drive B: was selected.
INSTALL DISK DRIVE
Drive Identifier: B|
Icon Label: FLOPPY DISK_
Icon Type:
Type a letter which will be used to identify the disc drive; this is usually A or B for a system with two floppy discs, or C for a hard disc. If you have more than two floppy discs, use any letter(s) for the additional drive(s). If appropriate, move the pointer to the next text field and click, use the DELETE key to erase FLOPPY DISK, and then type HARD DISK. Click on or as appropriate. Finally, click on to install the newly described disc, to remove the icon of an existing disc from the Desktop, or to retain the original status of the disc icons.
– allows the information stored about applications to be altered. An application icon must be selected. A dialogue is issued which reports the selected application's name, the document suffixes recognised for the application, the application's type and whether it requires full computer memory to be run. The application type for the supplied applications is GEM. It is also possible to install separately purchased DOS applications (e.g. WordStar). (DOS applications installed as run as soon as selected; those installed as require additional information to be supplied – for example, the name of a file to be loaded.)
A window shows the icons used to represent the application and the documents created by it. Use the scroll bars and slider to move through this window to select different icons to be used for the application and its documents. Type additional suffixes which you want GEM to recognise as identifying a document as created by the application. Click on to finalise the modification, on to retain the original description or on to delete an application icon. You will not need to alter the other options unless you buy another GEM application. In this case, the new application will be accompanied by instructions on its installation.
– allows the default behaviour of the Desktop and its commands to be altered. The following dialogue is issued:
SET PREFERENCES
| Confirm Deletes: | Yes | No | ||||
| Confirm Copies: | Yes | No | ||||
| Double‑Click Speed: | Slow | 2 | 3 | 4 | Fast | |
| Sound Effects: | On | Off |
The highlighted options are those currently set. Setting Confirm Deletes and/or Confirm Copies to will cause GEM to issue a warning message whenever the command is issued asking for confirmation. It is advisable to set Confirm Deletes to until you become familiar with the Desktop. The Double-Click Speed option enables you to alter the interval allowed between the two clicks of a double-click. Experiment with different settings until you find the one which suits you best. Click on to set the new preferences, or on to retain the original settings. The preferences will be reset to the original defaults on leaving GEM unless the Desktop is first saved.
– saves the current state of the Desktop as the default. Every time the Desktop is displayed, it will show the directory displayed and use the defaults set with when it was saved. For example, opening a folder other than GEMAPPS and then saving the Desktop will cause the resultant directory to be displayed by default. However, any alterations made to the contents of a directory will be reflected each time the Desktop is displayed – so deleted items will not reappear, and new items will be shown. If the folder providing the directory is itself deleted, the default Desktop will show the disc icons until another Desktop is saved.
– allows commands from the operating system to be used. Details of the operating system can be found in Part 2 of this manual.
5.5.3 Arrange
The Arrange menu offers commands to control the form in which the Desktop directories are displayed:
| Keystroke equivalents | ||
| Show as Text/Icons | COPY S | |
| Sort by Name | COPY N | |
| Sort by Type | COPY P | |
| Sort by Size | COPY Z | |
| Sort by Date | COPY T |
– displays the directories as text or icons. The default action is to show the contents of directories as icons, and the menu offers . Selecting this command displays a list of the names of folders, documents and applications in the current directory, with information about each item, and changes the menu command to . The order in which items in a directory shown as text are listed is controlled by the following commands. The current setting is indicated by an arrowhead to the left of the menu line.
– lists items in a directory in alphabetical order.
– lists first folders, then applications, then documents.
– lists items in order of size, measured as how many bytes of memory they occupy, beginning with the largest.
– lists items in the order in which they were created, beginning with the most recently created. The date and time are given in the form
<month>-<day>-<year> <hour>:<minute> <am/pm>
Items in a directory displayed as text can be opened and selected in the same way as items shown as icons.
5.5.4 DESKTOP
The DESKTOP menu offers the following commands:
– displays copyright information about GEM Desktop.
– takes a snapshot of the screen and saves it on disc, giving it the document type .IMG. Details of how to use the Snapshot facility are given in Paint, 3.6.7.
– superimposes the calculator over the window. Instructions on using the calculator are given in 2.13.1.
– superimposes the clock over the window. Instructions on using the clock are given in 2.13.2.
– displays the Print Spooler list, allowing document names to be added to or deleted from the list for printing. To add a name, click on the box and the item selector appears; select the document to be added. To delete a name, click on the name and then on the box. Click on its close box to remove the spooler list. Only text documents can be sent to the print spooler; they are printed in draft form (i.e. without special text attributes). Printing begins as soon as the item selector is removed from the screen (but is interrupted if it is restored to add more names).