< Previous | Contents (GEM) | Contents (DOS+) | Next >
3 GEM PAINT
3.1 Introduction
GEM Paint is a versatile and exciting graphics program. Using Paint, it is easy to create colourful images incorporating automatically generated patterns (which you can design yourself), regular and irregular shapes, and lines of different widths and styles.
GEM Paint provides facilities equivalent to ordinary painting techniques. There are 'brushes' of varying thicknesses and shapes, different colour 'paints', an 'airbrush', a 'pencil', and an 'eraser'. But in addition, Paint offers much more than the conventional paintbox. Regular and irregular geometric shapes can be generated easily; parts of the painting can be moved or copied after they have been created; sections can be moved or copied onto and from other paintings; areas can be flooded with a colour or a regular pattern; a section can be magnified, allowing you to work on it in detail.
Paint is very easy to use. The simplest way in which to become familiar with its capabilities is to experiment freely. This section introduces Paint, but you will learn through experience and exploration how best to use it.
3.2 Selecting GEM Paint
Beginning from GEM Desktop, open Paint by double-clicking on its icon (called ) or by clicking once on the icon and selecting from the File menu. The Paint screen will be displayed; it is illustrated on the next page.
Documents created in Paint are automatically given the suffix .IMG to identify them as pictures. The icon used on the Desktop to illustrate Paint documents shows that these are pictures, making them readily recognisable.
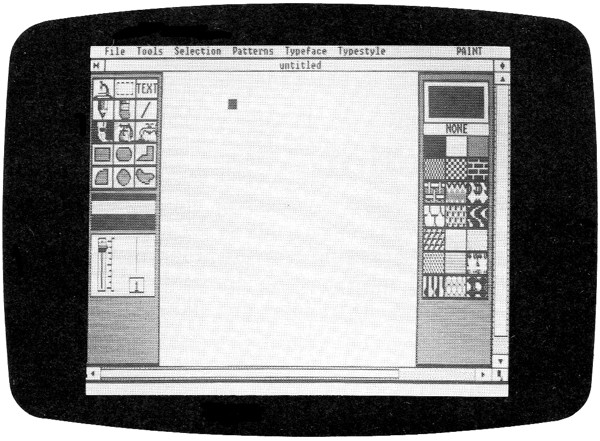 |
3.3 The Paint Screen
The Paint screen is illustrated above. Like the Desktop and Write screens, it has a menu bar along the top and a title bar beneath this. Every time you create a new picture, the title bar reports that the painting is Untitled until it is saved and given a name. When a picture which has previously been saved is recalled, its title appears, together with the directory pathname, indicating in which folder or series of folders it is stored (see 5.2).
A broad column down the lefthand side of the screen displays representations of options in Paint. The TOOLS PALETTE occupies the upper half of this, showing the fifteen tools available. Below this, the available colours are displayed in a strip called the COLOUR PALETTE. Beneath the colour palette are a scale and slider used to regulate the line width. The current line width is displayed and reported to the right of the slider.
The column on the righthand side of the screen displays the PATTERN PALETTE. The large rectangle at the top of this column shows the currently selected pattern. Beneath this are seven rows of three boxes, each displaying a different pattern. Shapes drawn or flood-filled are filled with the current pattern. The airbrush and paintbrush also use the current pattern.
The large blank area in the middle of the screen is the PAINTING SURFACE. Graphics may be drawn anywhere in this area.
As in Write and Desktop windows, the close box is in the upper lefthand corner; the full size box and the size box are in the top and bottom righthand corners respectively. In addition to the vertical scroll bars and slider common to other GEM windows, Paint has horizontal scroll bars and slider. All these are used to control the size and content of the window. Their operation is described in 3.7.1.
3.4 General Procedure
This section describes how to select and combine the various facilities of Paint. An operation is suggested which demonstrates the action of each selection procedure; follow the instructions and observe the results on the screen.
3.4.1 Default Parameters – Colour, Line Width, Pattern and Tool
When you enter Paint, you can start to draw immediately. Move the pointer onto the painting surface — it changes shape. Press the mouse button and drag. Paint draws a line along the path of the pointer using a style and pattern which are automatically selected by the program. These are known as the DEFAULT settings because they are used by default, that is, if no other line width, colour, pattern or tool is chosen in preference to them. At the start of each Paint session, the default tool, the paintbrush, is highlighted on the tools palette; the default pattern is a solid colour (the default colour), and the default line width is 1.
3.4.2 Selecting a Pattern
The default tool, the paintbrush, uses a pattern rather than a colour. At the start of Paint, the current pattern is a solid block of the default colour. To select a new pattern, move the pointer onto the required pattern and click once. The new pattern will be displayed in the CURRENT PATTERN box at the top of the pattern palette. Any geometric shapes you draw using the tools in the bottom two rows of the tools palette will be filled with this pattern. Using the tap to flood-fill will cause areas of the painting to be filled with this pattern, and the airbrush will also use this pattern.
It is possible to edit or re-design the patterns, and to store the new patterns for later use. This will be discussed later (3.6.4).
The pattern allows you to have no current pattern. When this is selected, geometric shapes will not be filled, the paintbrush will erase graphics in its path, and the tap and airbrush will erase areas of the picture. These effects are considered later.
3.4.3 Selecting a Tool
Because the paintbrush uses the current pattern instead of a colour, and is unaffected by changes in the line width, it is necessary to select a different tool to observe the effects of altering colour and line width.
To select a different tool, move the pointer onto the required tool and click once. The newly selected tool will be highlighted. The tools in the bottom two rows of the tools palette draw filled geometric shapes. The shapes drawn are always filled with the currently selected pattern. The pencil, eraser and airbrush operate in the same way as a conventional pencil, eraser and airbrush. The line tool draws straight lines, the icon allows text to be added to the picture, and the tap floods a space with the currently selected pattern. The microscope magnifies a section of the painting and the broken rectangle is used to select areas which can then be moved, copied, inverted, etc. The operation of each of the tools is described in Section 3.5.
3.4.4 Setting the Line Width
The scale and slider beneath the colour palette are used to select a thicker or thinner line. Move the pointer onto the indicator on the scale and drag it up or down to decrease or increase the line width. Alternatively, click in the square box to the right of the scale to increase the line width by increments of 2. Shift-click on the box to decrease the width by increments of 2. The thickest line (at the bottom of the scale) has a width value of 29; the line width is always increased or decreased in increments of 2. A line of the current width is displayed to the right of the slider, and a number representing the width is reported below this.
The line width set is used by the pencil, straight line and geometric shape tools. Change the line width and use the pencil to examine the effect.
3.4.5 Selecting a Colour
To select a different colour, move the pointer onto the required colour in the colour palette and click once. The current colour is used by the pencil and straight line tool, and for the outline of the shapes in the bottom two rows of the palette. Move the pointer back onto the painting surface and draw in the new colour using one of these tools.
3.5 The Tools Palette
This section describes the operation of each of the tools in the tools palette. The tools in the bottom two rows will be considered first.
3.5.1 Geometric Shapes
The tools in the bottom two rows draw regular and irregular geometric shapes filled with the current pattern. The outline is drawn in the current colour; the width of the outline is determined by the currently selected line width. To draw a shape without a visible outline, set the line width to 0.
The RECTANGLE tool at the start of the fourth row draws filled rectangles. Select the rectangle tool and position the pointer at the starting corner of the rectangle, then drag it to where you want the diagonally opposite corner to appear. As you drag across the screen, an outline of a rectangle moves with the pointer as a guide to the size and shape of the rectangle being drawn. Release the mouse button when the outline rectangle is the required size and shape. The rectangle is automatically filled with the current pattern.
The ROUNDED RECTANGLE operates in the same way as the RECTANGLE, except that it draws rectangles with rounded corners.
The QUADRANT at the beginning of the bottom row of tools draws quarters of a circle or elipse filled with the current pattern. The size and shape of the quadrant are defined by dragging the pointer. An outline arc appears, constantly showing the current size and shape of the quadrant during dragging.
The CIRCLE draws circles or ellipses filled with the current pattern. To make a circle, the vertical and horizontal distances covered by the dragged pointer must be equal. If the pointer moves further across the screen than up or down it, a long horizontal ellipse will be drawn. Correspondingly, moving the pointer a greater vertical than horizontal distance will draw a taller ellipse. An outline of the shape being drawn appears as a guide.
The POLYGON at the end of the fourth row draws polygons by linking straight lines defined by a series of clicks. Select the polygon, move the cursor to the starting point of the first side of the polygon and click. Then click for each subsequent corner (or vertex) of the polygon. Paint displays a line continuously to indicate the current appearance of the polygon between clicks. To complete the polygon, double-click, and the last vertex will be connected automatically to the starting point of the first line, and the polygon filled with the current pattern. (If the pattern set is NONE, the polygon will not be closed and filled.)
The CURVED SHAPE at the end of the fifth row draws free-form shapes. Move the pointer to the starting point of the shape, press the mouse button and drag to define the outline. When you release the button, the final point of the drag will automatically be joined to the first point by a straight line, and the shape filled with the current pattern. If the NONE pattern is selected, the shape will remain open and unfilled The size of the shape will be limited unless the NONE pattern is selected.
3.5.2 Painting Techniques
The tools in the second and third rows offer different painting techniques.
The PENCIL and ERASER operate in exactly the same way as their conventional counterparts. Select the pencil and draw some lines or shapes by dragging the pointer. Select the eraser and then drag the pointer across part of the painting surface. The painting beneath its path will be erased.
The STRAIGHT LINE tool at the end of the second row draws straight lines. Click on the starting point for the line, move the pointer and click on the end point of the line, or drag from the start to the finishing point. The lines are joined only if the pointer is not moved between the end of one line and the beginning of the next.
The PAINTBRUSH, AIRBRUSH and TAP all use the current pattern.
Several shapes and sizes of PAINTBRUSH are available. Double-click on the paintbrush to display the alternatives. The current brush is enclosed in a rectangle. Click on the brush you want. (To keep the same brush, click inside the rectangle.) There is also a menu command to display the paintbrush shapes (see 3.6.2).
The AIRBRUSH is similar to a conventional airbrush. As the pointer is dragged across the screen, a pattern of dots appears in its path. The colouring of the dots corresponds to an area of current pattern, but the density is not the same as if flood-fill was used, or a filled shape drawn. Covering the same area repeatedly will produce a more intense pattern, eventually giving full cover.
The TAP floods a closed area with the current pattern. A single click identifies the area to be filled. The pattern will flow through narrow gaps but will stop at the borders of any closed shapes (or the edge of the painting surface).
If the pattern is set to NONE, the tap erases blocks of pattern and the airbrush erases spots of pattern.
3.5.3 Text
The text tool is represented in the tools palette by . After selecting the text tool, click on the painting surface to identify the starting place for the text. The pointer changes to a vertical bar. Type the text you want using the keyboard in the usual way, and press the RETURN key at the end of the line. You can type as many lines as you like, and use the RETURN key to add blank lines. At the end of the text, press the RETURN key. You can move the cursor to a different position and resume typing text, or continue with other painting operations.
The font (the style and size of letters) is set using the Typeface and Typestyle menus discussed in Section 3.6.5 and 3.6.6.
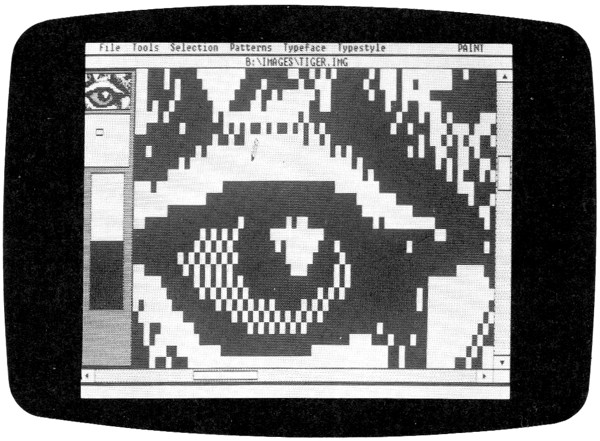
3.5.4 The Microscope
The microscope at the beginning of the first row of tools magnifies a small area of the screen for detailed work. After selecting the microscope, move the pointer until it is over the area you want enlarged, and click once. A rectangular area under the pointer is magnified and fills the whole painting surface. In the upper left of the screen, two small windows appear. The upper one shows the magnified area at its normal size. The position of the small rectangle in the lower window indicates the location on the whole painting of the magnified area.
The magnified image on the painting surface consists of small blocks of colour. Each block is known as a PIXEL (– a PICture ELement). To edit the painting, click on single pixels and they will change to the current colour. If a pixel is already displayed in the current colour, it will not change. The effect of the changes on the appearance of the area at full size is visible in the upper window.
 |
To move the microscope around the picture, drag the rectangle in the lower window. The upper window displays the area under the microscope as it moves. When the mouse button is released, the new area appears on the painting surface. Alternatively, use the sliders to move around the painting. (See 3.7.1 for a reminder of the operation of the scroll bars and slider.)
To return to the full-size painting, click in the upper window.
3.5.5 The Selector
The rectangle drawn in a broken line in the first row of the Tools Palette is the SELECTOR. It is used to select an area of the painting which can then be edited using commands from some of the menus, moved or copied.
To select an area of the screen, click on the selector, and then define a rectangle by dragging the pointer from one corner to the diagonally opposite corner. A guiding rectangle is displayed, indicating the area currently selected during the drag.
When you release the button, the selected area is enclosed in a rectangle drawn in a broken line. The segments of the line alternately flash on and off, giving the effect of a 'blinking' line.
When the pointer is inside the selected area, it changes to a hand. To COPY the selected area, drag from anywhere inside the box to the place on the painting surface where you want the copy to appear. To MOVE the selected area, hold down the CTRL key on the keyboard while dragging the box. A copied area can be moved without holding down the CTRL key; move the pointer back into the copied area and drag it to a new position.
Several operations offered in the menus require an area of the painting to be selected before they can be chosen. These are discussed in 3.6.3.
3.6 Menu Commands
The illustration of the Paint screen at the start of this section shows the location of the different menus in the menu bar. This subsection briefly describes the commands available in each of the menus.
Commands which appear in faint letters on the screen are not currently available. In Paint, this is often because an area of the picture must be selected before the command can be used, but it may be for some other reason. For example, if the painting is new and therefore has no title, the Save command in the File menu is not available; when a painting already has a name, this command appears in normal type.
3.6.1 File
The File menu offers the following commands:
– starts a new painting, replacing the current painting. Any picture already on the screen will be lost unless you first SAVE it. The following dialogue is issued as a warning:
| Abandon edited image? | Yes |
– deletes the painting.
and – return to the painting session, aborting the command.
– opens another painting which has previously been saved. This can be used to display a picture on a clear screen, or to open a painting in an additional window (see 3.7.2). The item selector is displayed when this command is chosen; click on the name of the required picture, or type in its name (and directory path name if necesary). You can use the slider to move up and down the directory if more documents are held in the folder than there is room to list. Use the close box to move through the directory path. (An account of pathnames and directories is given in GEM Desktop, 5.2.)
— closes the current painting. The Abandon edited image? dialogue is issued asking you to confirm the action.
– abandons the painting without saving the changes.
– saves the painting under the same name, preserving any changes made to it in the session.
– returns to the painting session.
– stores the changed picture under its original name, replacing the previous saved version. The painting remains on the screen and the session can continue.
It is advisable to save the image intermittently during a session. If a recent version has been saved, any mistakes you make, or a power or computer failure, will not necessitate re-creating the whole painting.
– stores the picture under the name you supply when the item selector appears. This can be used to save a second version of a picture that already has a name without overwriting the original version. If a document with the same name already exists, a dialogue offers you the opportunity to confirm or cancel the command before the original document is overwritten.
– removes the current painting without saving it. If the painting was untitled, the painting surface is left blank; if the picture has been previously saved, that version of the painting is restored to the screen. As a safety precaution, the Abandon edited image? dialogue is displayed, allowing you to confirm or cancel the command.
– abandons the changes to the painting, restoring the original state of the painting, or clearing the painting surface.
and – return to the painting session.
– enters the Output system allowing you to send an image of the picture to the screen or printer. If the current version of the painting has not been saved, the Abandon edited image? dialogue is displayed, as entering the Output system removes the painting from the screen.
– enters the Output system.
– displays the item selector so that the painting may be saved.
– returns to the painting session.
Details of the Output system are given in the Output Guide, Section 6 of this manual.
– returns to the Desktop. The Abandon edited image? dialogue is displayed if the painting has not been saved.
3.6.2 Tools
The Tools menu offers the following commands:
| Keyboard equivalent | ||
| ESCAPE |
– cancels the last operation, with some exceptions. cannot be cancelled itself; text cannot be cancelled after the RETURN key has been pressed; no more than one instance of any operation is cancelled – that is, if you have drawn three rectangles, cancels only the last one.
Pressing the ESCAPE key has the same effect as .
– turns on or off Paint's invisible grid. The invisible grid is made up of points approximately a quarter of an inch apart. When the grid is turned on, some graphics operations 'snap' to the grid point nearest to any position supplied. This helps to align parts of the painting more closely than is possible judging positions by eye. When the grid is turned off, the exact position under the pointer is taken as the starting point for the graphics produced.
– turns on or off the transparency of colour blocks. When transparent is on, any pattern or colour behind another block is partially visible. When transparent is off, all blocks are completely opaque. Changing the transparency setting does not affect the appearance of the picture already on the screen.
– displays the available brush shapes, a range of sizes and shapes. The current brush is enclosed in a rectangle. To select a different brush, click on it; this brush shape will be used whenever the paintbrush is selected.
The brush shapes are also displayed if you double-click on the paintbrush in the tools palette.
– superimposes a small window showing the whole painting. Inside the superimposed window, a rectangle indicates the area of the painting which is currently displayed on the painting surface. To display a different area of the painting, drag the rectangle to cover the required area. When you release the button, the newly selected area will be displayed.
– displays a dialogue offering different picture sizes: full, half, or quarter size, or as much as will fill the screen. The command deletes the picture from first the bottom and then the right. The reduction cannot be reversed; if the picture is not already saved, the full picture will be permanently lost.
3.6.3 Selection
The Selection menu offers the following commands:
All these commands require that an area of the painting surface is selected (see 3.5.5).
– clears all graphics from the selected area.
– reverses the colours in the selected area. If transparency is set ON, the selected area will consequently appear black.
– turns the graphics in the selected area around horizontally.
– turns the graphics in the selected area around vertically (turns the image over).
3.6.4 Patterns
The Patterns menu offers the following commands:
– hides or shows the pattern palette. By default, the pattern palette is shown, and the menu then displays the option. If this command is selected, the pattern palette is hidden, and the menu command displayed is the option. With the pattern palette hidden, you can draw over this area, but not select patterns.
– creates a new pattern from an area of the painting and adds it to the pattern palette, replacing an existing pattern.
Click on the pattern in the palette which is to be replaced, making this the current pattern, then click on the selector. Paint uses an area 16 pixels square for the new pattern; identify the area to be used by clicking over the position for the top lefthand corner of the square. The selected area will be enclosed in a `blinking' rectangle. Choose the command, and a pattern made by repeating this area will appear in the current pattern box, replacing the previous current pattern, and in the small box of the pattern palette originally occupied by the other pattern.
The new pattern will be lost at the end of the Paint session unless you save it using the command.
– allows a pattern in the pattern palette to be edited. Click on the pattern to be edited, making it current. When you select the command, a window will appear superimposed on the picture showing an area of the current pattern and a blank area. Move the pointer over the blank area and observe the changes to the pattern area. The blank area corresponds to a pattern block; the pattern is made up by repeating this block.
The available colours are displayed in a strip in the window; click on a colour to make it current. When the background colour is in use, the effects of moving the pointer are not visible in the drawing area, but the results of editing are continuously displayed in the pattern area. When the pattern is satisfactory, click on the box. Click on to return to the original pattern and remove the editing window.
Double-clicking on a pattern has the same effect as choosing the command.
An edited pattern can be saved for later use by the command.
– saves the current pattern palette on disc so that it can be recalled later. The item selector box appears; supply a name for the pattern file, which must end with the suffix .PAT (e.g. FRED1.PAT). The patterns can be recalled with the command
The pattern palette used at the start of Paint is called MONO.PAT. To replace this with a different set of patterns, first save MONO.PAT under a different name and then save the new pattern as MONO.PAT. (This can be achieved most easily from the Desktop; see 5.5.1.)
– recalls a pattern palette saved earlier. When the item selector appears, click on the name of a saved pattern document (with the suffix .PAT) or type the name (and directory path name if necessary) in the text field.
3.6.5 Typeface
The Typeface menu offers the typefaces and point sizes available for text. The currently selected style and size are marked.
The higher the number of the point size, the larger the letters appear on the screen. Not all sizes are available in each style.
Always press the RETURN key after entering text; if you select a new typeface size or style after adding text and without first pressing the RETURN key, the program will attempt to overwrite the last piece of text in the new size or style and may produce messy results.
3.6.6 Typestyle
The Typestyle menu offers the typefaces and justification modes available for text. The currently selected style and alignment are marked. Changing the options does not change the appearance of text already on the picture, except that the last piece of text added will change if you have not pressed RETURN and have not carried out any other operation since typing in the text. Similarly, the colour of the last piece of text will change if you select a different colour after typing in the text and before pressing RETURN or carrying out another operation.
– unsets the selection of special features; text typed in will appear in normal typeface in the size and style selected from the Typeface menu.
– causes text input to appear in bold type.
– causes text input to appear in italic type.
–underlines the text input.
– aligns text so that each line begins at the same position on the left (left-justification):
These words are left-justified;
the first
letter of the second line is directly beneath the first letter of the first line.
– aligns the text so that the centre of each line is at the same position (centre-justification):
| These words are centre-justified; they are aligned about the centre of each line, although the lines are of different lengths. |
– aligns text so that each line ends at the same position on the right (right-justification):
These words are right-justified; all the lines end |
3.6.7 PAINT
The PAINT menu offers information about Paint, and the desk accessories:
– reports information on GEM Paint. This is not all relevant to the Acorn version of Paint.
– takes a SNAPSHOT of the painting and saves it on disc. A window is superimposed on the painting surface showing a camera and a question mark. Click on the question mark to see instructions on how to use the Snapshot accessory. Click on the camera to take a snapshot. The item selector appears for you to supply a name for the saved picture; this must have the suffix .IMG (e.g. CATS.IMG). When the item selector disappears, drag the cursor to define the rectangular area which will form the snapshot. The snapshot is taken when the button is released. The camera window reappears so that you can take more snapshots. To close the accessory, click on its close box.
– superimposes the calculator over the window. Instructions on using the calculator are given in 2.13.1.
– superimposes the clock on the window. Instructions on using the clock are given in 2.13.2.
– displays the print spooler list, allowing document names to be added to or deleted from the list for printing. Only text documents can be sent to the print spooler. Instructions on using the print spooler are given in 4.6.7.
3.7 Windows
3.7.1 Size and Position of the Window
The size of the Paint screen can be altered using the size box and the full size box. The size box is the solid rectangle in the bottom righthand corner. To reduce the size of the window, position the pointer over the rectangle and then drag in towards the centre of the screen until the pointer reaches the new position for the bottom righthand corner of the window. To enlarge the window, drag the size box back out towards the bottom righthand corner of the screen. Click on the diamond shaped full size box symbol in the top righthand corner of the window to return the window to its full screen size, or to its most recent reduced size. Click repeatedly in the size box to reduce the size by a small increment.
When a reduced size window is on the screen, only part of the picture may be visible. To view a part of the picture which is not contained in the window, use the scroll bars and sliders. These are situated along the bottom and down the righthand side of the window. The slider is the clear area in the middle of the strip. To move to another area of the screen, drag the slider in the appropriate direction or click on one of the arrows at the ends of the scroll bars to move by increments. For example, to move down the picture, drag the vertical slider downwards or click on the arrow at the bottom of the vertical scroll bar. To move across the picture to the right, drag the horizontal slider to the left, or click on the arrow at the left of the horizontal scroll bar. When you release the button, the newly selected area of the painting will appear. If the slider is at one end of the strip, you have reached the edge of the picture. If it occupies the whole strip, the entire picture is visible.
To move a window, drag the title bar to the new position.
3.7.2 Using an Additional Window
It is possible to display and use two paintings at once. To open another painting, select the command from the File menu (see Section 3.6.1) and choose another painting. It will probably be necessary to reposition one or both windows and alter their sizes so that both are visible at the same time. Sections can be copied or moved from one window to the other.
Sections are moved or copied between windows in the same way as within a single window. The area is selected using the selector and dragged to a new position. If the CTRL key is held down, the area is moved; if not, it is copied.
One window is always ACTIVE; this is displayed over the other painting and is the one you can work on. To make a window active, click anywhere inside it.
When two windows are displayed, the title bar of the active window is highlighted.