< Previous | Contents (GEM) | Contents (DOS+) | Next >
7 APPENDIX: SET-UP GUIDE
7.1 Introduction
The following items make up the GEM package; check that you have all these:
| Hardware – | co-processor mouse |
Software – three discs holding the GEM software.
If any of these is missing, return to your dealer.
The order in which the installation is carried out is:
attach the mouse
fit the co-processor
configure the system
copy the discs.
If you have any problems with the installation, or if you feel uncertain about whether you can carry out the installation yourself, take the package and microcomputer to your dealer and ask him/her to install the package for you. The dealer may charge for the installation.
7.2 Attaching the Mouse
The mouse is attached by fitting its plug into the socket marked User Port on the underside of the microcomputer, near the front. The plug will only fit into the socket one way, so it is not possible to fit it incorrectly. Align the projection on the plug with the notch in the socket and press the plug in firmly. Two securing arms will move into place when the plug is correctly positioned. Ensure that these click across the back of the plug.
7.3 Fitting the Co-processor
7.3.1 Notes
Any modification or upgrade carried out to the printed circuit board of any Acorn equipment is undertaken at the sole risk of the person carrying out the modification or upgrade. No claim for loss or damage to the equipment caused by the modification or upgrade of the printed circuit board by unqualified personnel shall be accepted by Acorn Computers Ltd.
Some of the components used in Acorn equipment are sensitive to static electricity. Take precautions to prevent static electricity damaging the equipment.
Read all through the instructions before attempting the installation.
7.3.2 The Co-processor
The co-processor runs computer languages, applications and user programs. The microcomputer handles all input and output (e.g. input from the keyboard or discs, output to the screen, disc, printer, network, etc.). Communication between the co-processor and the microcomputer is by means of an interface known as the TUBE.
The co-processor fitted to run GEM is an 80186 co-processor.
7.3.3 Dismantling the Microcomputer
Disconnect the microcomputer from the mains supply.
The upper half of the case must be removed to allow access to the main printed circuit board. Turn the microcomputer upside down on a firm, flat surface. Locate the four fixing screws on the underside of the unit; there are two at the front and two at the rear of the case, and they are labelled FIX. These hold the upper part of the case in place. Remove all four screws; the two screws at the rear are longer than those at the front. Hold the two halves of the case together and carefully turn the computer back over so that it is the right way up. Lift away the top part of the case. This reveals the main printed circuit board where the co-processor is to be fitted.
7.3.4 Installing the Co-processor
The co-processor is a printed circuit board which is fitted above the main printed circuit board of the microcomputer and is supported by plastic support posts. Communication between the microcomputer and the co-processor is by means of the Tube, a series of pins which must be fitted exactly into the corresponding sockets on the computer's circuit board.
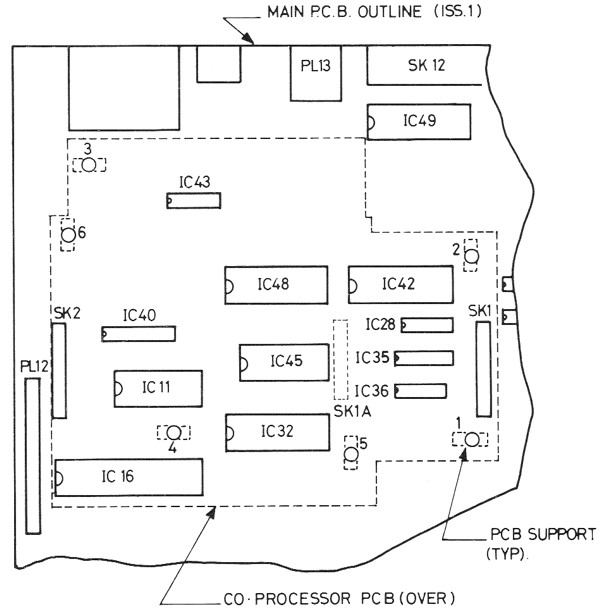
The support posts must first be inserted into the circuit board of the microcomputer. The illustration below shows the positions; the supports must be inserted in numerical order. There is no difference between the support posts, and both ends of the supports are identical. At each end of each support is a flange; this prevents the support being dislodged once it has been positioned, so it is important to align the support correctly before pushing it home. Place a support in the first hole and check that the flange does not obstruct or interfere with any component on the circuit board. When it is straight, press it down gently.
When all the support posts have been pressed in, place the co-processor on the supports, aligning the holes in it with the support posts. Ensure that the pins of PL1 on the co-processor are aligned with the corresponding holes in SK1 on the main circuit board, and that the pins of PL2 on the co-processor are aligned with the holes in SK2 on the main circuit board. When all the pins and support posts are correctly positioned, gently press the co-processor into place. Do not put too much pressure on the co-processor as this may damage it. The barbs on the ends of the supports should clear the co-processor board, and will make an audible click when they spring into place.
To re-assemble the microcomputer, replace the upper part of the case, hold the two parts together while carefully inverting the unit, and replace the four fixing screws. Use the longer screws in the two holes at the rear of the case.
 |
7.4 Configuration
Set up the microcomputer following the instructions in the Welcome Guide and turn it on. A message similar to the following should appear:
ACORN MOS
ACORN ADFS
BASIC
>_
Although the co-processor has been fitted correctly, the microcomputer does not yet recognise it. It is necessary to CONFIGURE the system to include the co-processor. Configuration may be performed either by using the control panel included with the Welcome package or using the *CONFIGURE command To use the *CONFIGURE command, type
*CONFIGURE TUBE RETURN
*CONFIGURE INTUBE RETURN
and then press the CTRL and BREAK keys simultaneously. A message similar to the following should then appear:
ACORN TUBE 80186 512K
ACORN ADFS
BASIC
The top line of the display acknowledges the presence of the tube, which is now recognised. The first disc drive will begin to operate as the microcomputer waits for an operating system to be loaded. This will be done next.
If the message displayed does not acknowledge the presence of the co-processor, use the *STATUS command to determine whether the Tube has been correctly configured. If it has, check that it has been fitted correctly. If no obvious mistakes have been made, take the microcomputer to a registered Acorn dealer for testing.
7.5 Copying the Software
It is VERY IMPORTANT that you copy the GEM discs before using them to run GEM. If you always use copies, you can make another copy in the event of losing or destroying your working copy, or inadvertantly deleting any of the data needed to run GEM. Ensure that the master copies are write-protected so that the data cannot be corrupted or deleted.
The procedure for copying the software is not the same with a system using floppy discs as with a system using a hard disc. Follow the instructions in 7.5.1 and 7.5.2 for a floppy disc system, or those in 7.5.3 for a hard disc system.
7.5.1 Formatting the Discs – FLOPPY DISC SYSTEM
Three discs are needed to hold the GEM software:
the BOOT disc holds the data needed to load DOS, the operating system from which GEM is entered.
the PROGRAM disc holds the GEM programs.
the DATA disc stores data for documents you create or which are supplied.
If necessary, configure the system to acknowledge the presence of the co-processor (this is described in 7.4). The top disc drive should be operating, and the red light should be illuminated. Insert the Boot disc into the drive and close the door. A message similar to
Loading DOS..
indicates that the operating system is being loaded. When loading is complete, the prompt
A>
appears. Type
DISK RETURN
and insert a blank disc into the second disc drive. A list of options is displayed; one of these is Format Diskette, and is highlighted. Press the RETURN key to accept this selection. A list of format options appears; when copying discs, it is necessary to use the same format as that of the disc to be copied. In this case, the required format is 640 Kb [DOS] Bootable DOS Disk, which is already highlighted. Press the RETURN key to select this format. A message asking you to confirm the selection appears; press RETURN again, and close the door of the second disc drive when the drive begins to operate. The progress of the formatting operation is reported as it proceeds.
When formatting is complete, a message asks whether the disc is to be made bootable. Yes is highlighted; press the RETURN key to make the disc bootable. At the end of the verifying procedure, the formatting options list reappears. Remove the disc in the second drive, insert another blank disc and use the arrow key or space bar to select the format 800Kb [DOS] Acorn DOS Format. Repeat the formatting; this time the verifying procedure will follow automatically with no message. After formatting the second disc, insert and format the third in the same way (i.e. 800Kb format).
When the formatting options are displayed after formatting the third disc, use the arrow key or space bar to select the option Return to main menu and press RETURN. The first selection list is restored.
Any additional data discs you want to create to hold GEM documents must also be formatted as 800Kb discs.
7.5.2 Copying the Discs – FLOPPY DISC SYSTEM
Leave the Boot disc in the first disc drive and insert the blank, newly formatted 640Kb (Bootable DOS) disc into the second drive. Use the ↑ key to select the option Copy Diskette and press RETURN. The next selection offers Copy from drive A: – press RETURN to accept this, and again to accept the next selection, Copy to drive B:. A warning message asks you to confirm the copy command; press RETURN again. The progress of the copying is reported as it proceeds. When copying is complete, remove the discs, and write a label and attach it to the copy. (Always write the label BEFORE attaching it to the disc, to avoid damaging the disc.) Put a blank 800Kb disc in the second drive, and the Program disc in the first drive. Repeat the copying procedure, and then copy the Data disc onto the other blank disc. Label each newly copied disc, and put a write-protect tag over the new Boot disc.
7.5.3 Copying the Discs – HARD DISC SYSTEM
Before configuring the system to recognise the Tube, ensure that the drive is correctly connected and that the disc is formatted. Consult the Winchester Disc Filing System User Guide for instructions if necessary. Configure the system and load DOS as described in Section 7.4.
The first stage is to create a partition on the disc to hold the GEM software. Type the command
HDISK RETURN
Several sizes of partition will be offered. It is not necessary to allocate all the available space to DOS, and it is possible to alter the size of the partition later (although this will involve deletion of all the data stored). A partition of ten megabytes is a suitable size. If a message reports that the disc is full, select a smaller size. If a message reports that compaction is necessary, consult the Winchester Disc Filing System User Guide for instructions on compacting the disc.
Select a size and press the RETURN key. Press it again to confirm the choice. Progress is reported as the disc is processed.
The list of selections returns to the screen. Use the arrow keys to select Make Bootable, press the RETURN key, and press it again to confirm the selection. Progress is reported. This copies the operating system from the floppy disc.
It is now possible to load DOS from the hard disc; press the CTRL and BREAK keys simultaneously. When prompted, press the RETURN key to load DOS.
The next stage is to copy the GEM discs onto the hard disc. Type
HDINSTAL RETURN
The system prompts for the discs to be inserted in the correct order – follow the instructions to copy the discs.
The system is now ready for loading GEM. Turn to Section 2 of this manual for instructions. If you want to turn off the co-processor instead, ensure that the Boot disc is in the first drive and then type
NOTUBE RETURN
This re-configures the system to bypass the Tube.