< Previous | Contents (GEM) | Contents (DOS+) | Next >
4 GEM WRITE
4.1 Introduction
GEM Write is a versatile word-processing program which is very easy to use. Unlike many word-processing systems, it does not require you to remember sequences of combined keystrokes to invoke the various operations available. Instead, all the operations are displayed on the drop-down menus and are selected by clicking. However, if you prefer to use keystrokes, many of the keystrokes used in WordStar and Volkswriter are recognised by Write (see 4.8).
The most innovative feature of GEM Write is its link with GEM Paint, enabling graphics to be added to the text. A picture drawn with Paint can easily be inserted at any point into a document written with Write. This makes it possible to create impressive and attractive illustrated documents very simply.
A tutorial in three parts is supplied on the GEM discs. This introduces and explains the facilities available within Write. This manual provides a backup to the tutorial, and can be used for reference, but you should use the tutorial to learn how to use Write.
4.2 Starting GEM Write
If you are using floppy discs, insert the Data disc into the second disc drive; close the door when the light comes on after selecting Write.
Beginning from the GEM Desktop, open Write by double-clicking on its icon (, illustrated with a typewriter), or by clicking once on it and then selecting from the File menu. The Write screen will appear. This is shown below.
Documents created in Write are automatically given the suffix .DOC to identify them as text documents. The icon used on the Desktop to illustrate a Write document shows 'writing' on a page, identifying it as a text document.
The first time you use GEM Write, the following dialogue will appear:
WELCOME TO GEM WRITE!
Please enter the following so that GEM Write can be personalized for your use.
| My name is: |________________________ | |||||
| My system has | |||||
| Floppy Disks: | 1 | 2 | |||
| Hard Disk | Yes | No | |||
| OK | |||||
Supply the information required and click on to start Write.
4.3 The Write Screen
The Write screen is illustrated below. Like the Desktop and Paint windows, it has a menu bar along the top and a title bar beneath this. Every time you create a new document, the title bar shows that the document is Untitled until it is saved and given a name. When a document which has previously been saved is recalled, its name, including the directory path name, appears in the title bar. The directory path name indicates where the document is stored (see 5.2).
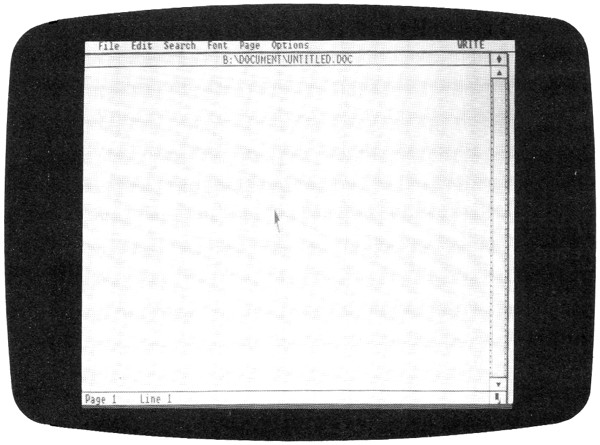 |
A slider and scroll bars down the righthand side of the screen allow you to move up and down through the document. When you start a new document, the slider occupies the whole of the strip, indicating that all the document is displayed on the screen.
The symbol in the lower righthand corner is the size box. Drag the size box to modify the size of the window, or click on it to reduce the size by increments. Click on the full size box in the upper righthand corner to restore the window to full size. If you click on the full size box when the window is at full size, it will return to its most recent reduced size.
The CURSOR is the flashing bar which is initially located in the top lefthand corner of the writing area. This indicates the position at which text or modifications to the text will appear. It can be moved around the screen to insert, move, copy, edit or delete text.
A bar along the bottom of the window, the STATUS BAR, reports the current location of the cursor expressed as the page number and the number of the line on that page. Any messages issued by the Write program are displayed in this line.
The cursor is at the top of the document when you create a new document. You can begin to type immediately.
4.4 Using the Tutorial
The Write tutorial is divided into three sections. The three parts are stored on the Data disc, and have the titles TUTOR1.DOC, TUTOR2.DOC and TUTOR3.DOC. The tutorial documents are held in a folder called TUTORIAL.
To load the first part of the tutorial, move the pointer over the name of the File menu so that this menu drops down, select the command and, when the item selector appears, click on the line offering . The diamond symbol to the left of the line indicates that this is the name of a folder. The contents of the Tutorial folder are listed in the item selector; click on to display the first tutorial document.
If at any point you want to leave the tutorial, whether to use Write on your own, or to use another application, or to finish the GEM session, select the command from the File menu. If you have altered the document, a dialogue appears warning that the document has not been saved; DO NOT SAVE THE TUTORIALS. The tutorials are already preserved on disc, and saving them after editing them will destroy the original versions. Click on to close the tutorial document and return to the Desktop.
4.5 Basic Techniques
4.5.1 Moving the Cursor
Text always appears at the position of the cursor, thus it is obviously necessary to be able to move the cursor around the document in order to edit the text. Most simply, if you make a mistake when typing in text, press the DELETE key (next to the SHIFT key on the right). This deletes the last character typed and moves the cursor back one character. Holding down the DELETE key deletes characters rapidly as long as you hold it down. Very frequently, though, you will need to move the cursor to a different part of the document.
To move the cursor to a part of the document which is visible on the screen, move the pointer to the appropriate position, and click once. The cursor jumps to the position of the pointer. Use the scroll bar to move up or down through the document to go to parts which are not immediately visible on the screen, then position the pointer and click as before.
The arrow keys above the RETURN key move the cursor one character to the left, right, up or down.
Several key combinations move the cursor automatically to positions in the document which may be useful. The following combinations use the arrow keys:
| Hold down SHIFT and press ↑ | moves up half a screen | |
| Hold down SHIFT and press ↓ | moves down half a screen | |
| Hold down CTRL and press ↑ | moves to line 1 of the last page | |
| Hold down CTRL and press ↓ | moves to line 1 of the next page |
The keys in the following instructions are the numbers on the numeric keypad. Each key has a name; the number corresponding to the key name is given in brackets after the name. If at first the key does not perform the function, and numbers are inserted into the text, press the SHIFT LOCK key. (The shift lock light should be off.)
| Press HOME | ( 7 ) | twice | cursor moves to upper left of screen | ||||
| Press HOME | ( 7 ) | three times | page 1, line 1 | ||||
| Press HOME | ( 7 ) | then END | ( 1 ) | last page, end of last line | |||
| Press HOME | ( 7 ) | then UP ARROW | ( 8 ) | top of screen, same column | |||
| Press HOME | ( 7 ) | then DOWN ARROW | ( 2 ) | bottom of screen, same column | |||
| Press HOME | ( 7 ) | then LEFT ARROW | ( 4 ) | beginning of line | |||
| Press HOME | ( 7 ) | then RIGHT ARROW | ( 6 ) | end of line | |||
| Press HOME | ( 7 ) | then PAGE UP | ( 9 ) | up one screen | |||
| Press HOME | ( 7 ) | then PAGE DOWN | ( 3 ) | down one screen | |||
| Press END | ( 1 ) | lower left of screen |
4.5.2 Selecting Text
Many commands offered in Write menus require that a portion of the text is selected. If no text is selected, these commands appear only in faint letters and cannot be chosen.
There are three methods of selecting text:
Move the pointer to the beginning of the passage to be selected and drag to the end. Releasing the button marks the end of the selected pssage. As you drag, the selected text is highlighted; the selected passage remains highlighted after you release the button.
OR
Using the Function keys – these are the red keys along the top of the keyboard numbered f0 to f9 . Move the cursor to the beginning of the passage to be selected and press the function key f5 ; all the text after the cursor becomes highlighted. Use the arrow keys to move the cursor to the end of the passage to be selected and press f6 ; the highlighting disappears from the text after the cursor.
OR
Move the pointer to the beginning of the passage to be selected, and shift-click; all the text after the cursor becomes highlighted. Move the pointer to the end of the passage to be selected and shift-click again; the highlighting disappears from the text after the pointer.
The first and second of these options are most useful for selecting passages visible on a single screen. The first can be modified to select entire lines; move the pointer into the lefthand margin and move down to indicate which lines are to be selected. To select one line, click in the margin against the required line.
The third method is most useful for selecting text which covers two or more screens. The second method can also be used to select text over two or more screens. Move the cursor to the start of the text to be selected, press f5 , then display the Search menu and click on the command (see 4.6.3). Supply the destination page or line number and click on . When the page appears, use the arrow keys to move the cursor to the end of the selected passage, and press f6 .
 |
4.6 Menu Commands
Many of the commands offered in the menus can also be obtained from the keyboard. The combination of keystrokes required to invoke a menu command is indicated at the end of the menu line. Where the function key name is preceded by an arrow in the menu line, press the SHIFT key down at the same time as the function key. Where it is preceded by a diamond symbol, press the COPY key at the same time as the function key. Where it is preceded by the symbol ^, press the CTRL key at the same time as the function key.
Using the keystroke combinations is exactly equivalent to selecting the corresponding menu commands. For example, COPY and f2 pressed together are equivalent to selecting the command: the dialogue is displayed as when the menu is used. ( is in the File menu; see 4.6.1.)
In the following descriptions of the menu commands, the keystroke alternatives are given to the right of the menu commands.
4.6.1 File
The File menu offers the following commands:
| Keyboard equivalent | ||
| New | COPY f0 | |
| Open . . . | ||
| Insert Text . . . | COPY f2 | |
| Insert Graphics . . . | ||
| Save | f2 | |
| Save As . . . | ||
| Abandon | ||
| Print Draft | COPY f1 | |
| To Output | ||
| Quit |
– begins and displays a new, empty document. Any current document will be lost unless you save it first. A warning dialogue is issued to confirm loss of the current document:
| You have not SAVED the file you were editing. Changes made will be lost if you OPEN or start a NEW file. |
OK Cancel |
– opens a previously saved document. The item selector is displayed when this command is selected. Click against the name of the document required, or type in the name, including the directory path name, if necessary; use the arrow and DELETE keys to move to and edit the directory path name. Use the slider to move through the window if the folder contains more documents than there is room to list. Use the close box to move through the directory path; an account of pathnames and directories is given in 5.2.
– inserts a text document into the current document at the position of the cursor. The item selector is displayed; click against the document required, moving through the window or directory path as necessary. The document selected must have the suffix .DOC.
– inserts a graphics document into the current document at the position of the cursor. The document selected must be a GEM graphics document with the suffix .IMG. The item selector appears when this command is issued. Click on its close box to move up through the directory path until the folders DOCUMENTS and IMAGES are offered; click on to display a list of .IMG documents and select one.
The picture will either appear in the text, or shading and its title will indicate the area to be occupied by the picture. This depends upon the setting of the command (4.6.5). The picture is printed when the document is printed, whether or not the graphics are set on.
– saves the current document under the same name, overwriting the previous version. If the document is new, this command is not available.
– saves a document under the name supplied. The item selector is displayed; supply a name for the document. The name may have up to eight characters, and must have the suffix .DOC to identify it as a text document. (If you give it a different suffix, GEM may be unable to save the format of the document properly, and you will not be able to insert the document into another Write document, or send it to the print spooler or output list.) You can use the command to save a second version of a document without overwriting the original version.
To save part of a document, select the part of the text to be saved and then use the command; only the selected passage will be saved.
– aborts the changes made to the current document and restores the most recently saved version to the screen. If it is a new document, it is deleted. A warning dialogue is issued to confirm the choice.
– prints a draft of the document without special text attributes (such as underlining) or pictures, but with HEADERS and FOOTERS (see 4.7.3). The document is printed from the position of the cursor to the end.
– enters the Output system and creates an output file for the current document. The following dialogue is issued:
| Create .OUT file and start OUTPUT . . . and stay in WRITE |
Start Stay Cancel |
– leaves Write, creates an output file and adds it to the Output list, and enters the output system.
– creates an output file and adds it to the Output list, but stays in Write.
– remains in Write.
The Output system is described in Section 6 of this manual.
– returns to the Desktop. A warning dialogue is issued to confirm exit from Write without saving the current document, as this will be lost.
4.6.2 Edit
The Edit menu offers the following commands:
| Keyboard equivalent | ||
| Insert Line | COPY f3 | |
| Center Line | COPY f9 | |
| Delete Line | CTRL f4 | |
| Move | COPY f5 | |
| Copy | COPY f6 | |
| Delete | COPY f8 |
The last three of these commands operate on selected text; if no text is selected, the commands will not be available.
– inserts a blank line at the position of the cursor, moving down any text previously on that line.
– centres the line on which the cursor is positioned between the set margins.
– deletes the line on which the cursor is positioned, moving the text below that line upwards.
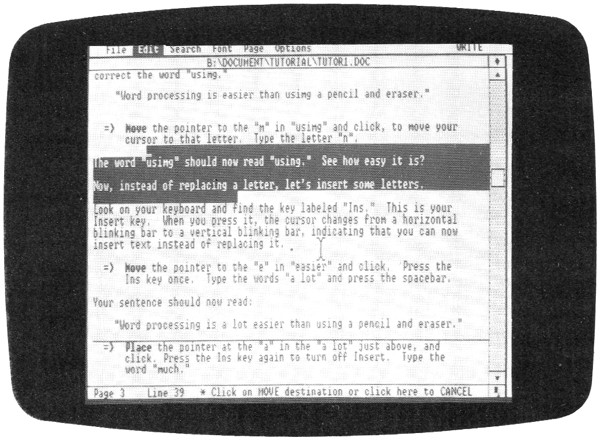
– moves the selected text, adjusting the position of the other text to accommodate it. The pointer changes shape to a vertical bar (called an I-BEAM) and a message appears in the status line:
* Click on MOVE destination or click here to CANCEL
Move the I-beam to the new position of the text, press down the mouse button and the I-beam changes to the INSERT CURSOR. Move this to the final position and release the button; the text moves to the new position. If the first line of a picture block is included in the selected text, the whole picture is moved.
– copies the selected text, adjusting the position of the other text to accommodate it if necessary. As with Move, the pointer changes to an I-beam and then the insert cursor appears when the mouse button is pressed down. The message
* Click on COPY destination or click here to CANCEL
appears in the status line. If the first line of a picture block is included in the selected text, the whole picture is copied.
– deletes the selected text and moves up the text below it.
4.6.3 Search
The Search menu offers the following commands:
| Keyboard equivalent | ||
| Find . . . | ||
| Replace . . . | ||
| Find Next | f7 | |
| Replace Next | COPY f7 | |
| Go To . . . | CTRL f7 |
– finds the first occurrence of a sequence of characters in the document. A dialogue appears; type in the string of characters to be sought and click on . (A string is any sequence of letters, numbers, spaces and punctuation marks.) The cursor moves to the next occurrence of the string in the text. Select the command to move the cursor to the following incidence of the string.
Only occurrences of the string which match exactly the sequence supplied to will be identified; take care to use upper- and lower-case as appropriate. To find occurrences both with and without an initial capital, omit the first letter. For example, to find both `Typing' and 'typing', supply yping as the string.
– replaces one string of characters with another. The following dialogue appears:
| Find: |_________________________ | ||||||
| Replace with: _________________________ | ||||||
| Replace all? | Yes | No | (Press f0 to stop) | |||
| OK | Cancel | |||||
Supply the first string, use the mouse, arrow keys or TAB key to move to the second line and supply the string which is to replace the first. Then click on to replace all occurrences of the first string with the second string, or on to move from one incidence of the string to the next, optionally replacing each. The default is . Click on to begin the operation, or on to cancel it.
Unless you clicked on , the cursor will move to the next occurrence of the first string. Select the command to replace it, or the command to leave it unchanged and move to the next occurrence. You can interrupt the search to edit the text at any time. The replacement string will always appear in the same type style as that it replaces.
To stop replacement of all occurrences of a string once begun, press the f0 key.
– moves the cursor to the next occurrence of a string supplied to a or command.
– replaces the character string at the position of the cursor with the string supplied to the command. Use without using to find and replace the next occurrence of the string in a single move.
– moves the cursor to the page and line specified. When a dialogue appears, supply a page number, or a line number if pagination has been set OFF with the command in the menu (see 4.6.5).
4.6.4 Font
The Font menu offers the different type styles:
| Keyboard equivalent | ||
| Normal | ||
| Bold | SHIFT f7 | |
| Italic | SHIFT f0 | |
| Underline | SHIFT f9 |
All these operate on selected text; if no text is selected, the commands are not available. The text remains selected after a change in style.
– returns the selected text to a normal type face. This has no effect if the selected text is already in normal type.
– changes the selected text to bold type.
– changes the selected text to italic type.
– underlines the selected text.
4.6.5 Page
The Page menu offers the following commands:
| Keyboard equivalent | ||
| Turn Graphics Off/On | ||
| Turn Auto‑Reformat On/Off | ||
| Turn Insert Mode On/Off | ||
| Show Ruler | ||
| Set Tabs & Margins . . . | f9 | |
| Format . . . | CTRL f1 |
– controls whether pictures are displayed or replaced by shading. When graphics are set ON, the menu offers , and vice versa. Clicking on the command changes the setting, and the menu then displays the other option.
When graphics are set OFF, the name of the picture precedes the lines reserved for it. You cannot write in or alter these lines. With graphics set off, the screen is redrawn more quickly than with graphics on.
– controls whether or not text is automatically re-aligned between the margins after insertions. When auto-reformatting is set ON, text is re-aligned at the next movement of the mouse, or click on the text. Clicking on the command changes the setting, and the menu then displays the other option. When auto-refomatting is set OFF, text is not re-aligned automatically. Each paragraph can be reformatted by positioning the cursor at the start of the paragraph and pressing the f8 key. Text will be reformatted up to the next ¶ character. Press CTRL and f3 to make the paragraph markers (¶ characters) visible; press it again to hide them.
– controls whether text typed overwrites existing text or is inserted in front of it. When insert mode is set ON, the menu offers , and vice versa. Clicking on the command changes the setting, and the menu then displays the other option.
With insert mode set ON, the cursor appears as a vertical bar, and text typed is inserted immediately after the cursor.
– displays the RULER marked with the tab positions and margins. The ruler is graduated, each position corresponding to a character in a text line. The diamond symbols mark TAB positions, the right angle bracket (>) marks the left margin, and the left angle bracket marks the right margin (<). The left margin is the position at which the text starts, the right margin marks the position at which the text line finishes. The TABS allow the text to be aligned in columns easily. Pressing the TAB key on the keyboard causes the cursor to jump to the next tab position. For example, if a tab is set beneath the figure '1' on the ruler (corresponding to the tenth character in the line) and the TAB key is pressed when the cursor is at the start of a line, the cursor will jump to the tenth character position.
The column in which the cursor is currently positioned is indicated on the ruler by a solid rectangle. If the righthand margin indicator is not visible, move the cursor to the end of the line to make it visible.
When the ruler is hidden, the command reads ; when the ruler is displayed, the command reads .
Whenever the ruler is displayed, tabs and margins can be set. When the pointer moves onto the ruler it changes to a hand. Tabs and margins are set in the same way as when using the command (below).
– allows tabs and margins to be set. The pointer changes to a hand, and a dialogue appears describing how tabs and margins can be set. Click over the character position in which a tab is required, either on the ruler or somewhere in the text. Click on an existing tab symbol to clear that tab. Drag the margin indicators to their new positions; during dragging the margin indicator is highlighted. When the tabs and margins are correct, click on . To restore the original tabs and margins, click on .
Resetting the tabs and margins does not affect existing text.
– displays the Format dialogue, allowing options to be set:
PAGE FORMAT FOR OUTPUT
| Document mode: | On | Off | ||||
| Pagination: | On | Off | ||||
| Justification: | On | Off | ||||
| Line spacing: | 1 | 2 | 3 | |||
| Page length: | 66 lines | |||||
| Text begins on: | 3_ | |||||
| ends on: | 60 | |||||
| Left margin: | 5| characters | |||||
The options have the following effects:
Document mode – cancels auto- and manual reformatting, prevents paragraph markers being entered in the text when the RETURN key is pressed, turns off the Font menu commands and text selection. restores these attributes.
Pagination – controls display of the page number in the status line. If it is set , the options Page length, Text begins on and Text ends on can be used to control the format of the page.
Justification – controls whether the text is right justified (i.e. is aligned down the righthand margin). This affects printed text, but not the appearance of text on the screen.
Line spacing – sets the line spacing to single, double or triple.
Page length – sets the number of lines allowed for each page. (Set this to conform with the paper size used by the printer; 66 is a standard length.)
Text begins on – sets the line at which printing will begin (not including any headers). The number of lines available for headers is determined by this setting; for example, if the text starts on line 10, 9 lines of headers could be printed.
Text ends on – sets the line at which printing will end on each page. The number of lines available for footers is determined by this setting and the page length. For example, if the page length is set to 66 and the text ends on line 60, 6 lines of footers could be printed.
Left margin – controls the character position at which text will start printing from the left.
Click on when the options are correct, or on to retain the original settings.
4.6.6 Options
The Options menu offers the following commands:
| Keyboard equivalent | ||
| Short Cuts . . . | f1 | |
| Set Preferences . . . |
– displays a list of helpful shortcuts and explains the conventions used in the keystroke alternatives listed in the menus.
– displays the Set Preferences dialogue, allowing you to alter the program default settings (i.e. the actions which will be taken if no alternative is requested):
SET PREFERENCES
| Turn Graphics: | On | Off | ||
| Turn Auto-Reformat: | On | Off | ||
| Create *.BAK files: | On | Off | ||
| Delete *.OUT files: | On | Off | ||
| Defaults for startup: | ||||
| Document Disk: | B| | |||
| Spill-file Disk: | B |
The options have the following effect:
Turn Graphics – controls the display of pictures in the text or their replacement with shading.
Turn Auto-Reformat – controls whether text is automatically reformatted within a paragraph after every editing command.
Create *.BAK files – controls whether, when a previously saved document is saved again, the previous version is stored with the file type .BAK as a back-up copy.
This is a useful security precaution if it is possible that you will want to return to the original version, but uses extra disc space to store the additional version.
– controls whether the automatically created output file is deleted after printing. If you want to print the same document several times without changing it, it will be useful to retain the .OUT file (set Delete to OFF). Deletion of unnecessary output files saves disc space.
Document Disk – indicates on which disc drive the documents are to be stored and sought. This will be B with a dual disc drive or C with a hard disc. If you have more than two disc drives, other options will be possible.
Spill-file Disk – indicates on which disc drive the SPILL-FILES are stored. These are automatically created temporary files which hold parts of a document too large to be stored in the computer's memory. With a dual drive, this will be B, with a hard disc it will be C. Enter X to prevent use of any spill-files.
Do not change discs during an editing session, as the spill-files will be lost. If you change the spill-file drive it will be necessary to exit from GEM Write and restart it.
4.6.7 WRITE
The WRITE menu offers the following commands:
– displays copyright information about GEM Write; not all of this applies to the Acorn version.
– takes a snapshot of the screen and saves it on disc, giving it the document type .IMG. Details of how to use the Snapshot facility are given in Paint, 3.6.7.
– superimposes the calculator over the window. Instructions on using the calculator are given in 2.13.1.
– superimposes the clock over the window. Instructions on using the clock are given in 2.13.2.
– displays the Print Spooler list, allowing document names to be added to or deleted from the list for printing. To add a name, click on the box and the item selector appears; select the document to be added. Only text can be sent to the spooler; documents must have the suffix .DOC. To delete a name, click on the name and then on the box. Documents are printed immediately, as soon as the item selector is removed from the screen. Printing is interrupted whenever the item selector is displayed. Text is printed in draft form, without special text attributes (bold type, underlining, etc.). Click on its close box to remove the spooler list.
4.7 Embedded Commands
EMBEDDED COMMANDS are commands typed into the text which control the presentation of the document on the page when it is printed out. They offer the facility to define HEADERS and FOOTERS (lines of text which appear above or below the main body of the text, such as running chapter headings or page numbers), to force a page break, to reset the page number counter, to send special command sequences to the printer, or to insert non-printing comments. Embedded commands are recognised by GEM Write as having a special status; they are not printed literally, and are not counted in the line count.
Embedded commands are preceded by two full stops. They must begin in the first two columns of the text. They may be typed in upper or lower case.
4.7.1 ..PAGE
The ..PAGE command forces a page break. The new page will start with the next line of text.
4.7.2 ..<comment>
A comment may be inserted for reference while editing. It will not be printed. This may be useful for providing reminders, recording the date of a draft, etc.
4.7.3 ..HEAD and ..FOOT
The header and footer commands have the format
..HEAD<number><letter><text>
and
..FOOT<number><letter><text>
The number must be a two-digit number identifying the number of the line to be occupied by the header or footer. The number must fall within the lines allowed for printing headers and footers when the page format was set with the command (see 4.6.5). The letter must be one of the following: C, L, R, A. This controls the alignment of the header or footer. C positions it centrally, L prints from the lefthand side of the page, R aligns the end of the header or footer with the righthand margin, and A aligns the text on the left and right alternately. The text supplied will appear literally, except that page numbers can be included by inserting two hash (#) signs in the text. For example, the command
..HEAD03AChapter 1 – Page ##
would print a header on the third line of every page, aligned alternately on the left and right, with the text
Chapter 1 - Page <number>
with the current page number inserted.
The headers and footers will appear on the next page after that on which the command appears. List header and footer commands in the order in which they are to be printed (i.e. in consecutive order of line number), and insert them before other embedded commands where possible.
4.7.4 ..PGNO
The ..PGNO command resets the page number counter to the number supplied. The format of the command is
..PGNO <number>
The next page will have the number specified.
4.7.5 ..CMD
The ..CMD command sends a command code to the printer. The meaning of each command code will depend upon the type of printer in use; consult the printer manual to determine the functions of the codes which can be used with this command.
4.7.6 ..GEM
The ..GEM command is automatically entered by GEM when a picture is inserted into the text. It has the format
..GEM,<number>,< picture name>
The number indicates how many lines the picture occupies. The picture name is reported in full, including the full directory path name and a letter identifying the disc drive.
4.8 Compatibility with other Programs
GEM Write can be used with any documents in standard ASCII format, whether or not they were originally produced using Write. Select and open the document in the usual way using the item selector. However, the only graphics documents which can be inserted into Write text documents are those created in GEM (using GEM Paint or GEM Draw).
Write acknowledges many of the most frequently used commands from the common word-processing programs WordStar and Volkswriter. A list of the keystrokes recognised by Write is given in one of the tutorial documents.