< Previous | Contents (GEM) | Contents (DOS+) | Next >
3 DISC HANDLING
3.1 Introduction
This chapter looks at how you prepare discs and organise files, when using DOS Plus or applications that run under DOS Plus. You will be familiar with some of these procedures already, as they were introduced in the previous chapter when you copied the DOS Plus boot disc. Here we look at the whole process of formatting, verifying and copying discs. We also show you how to create families of files to simplify the storage and retrieval of data.
3.2 Formatting and verifying discs under DOS Plus
An unformatted disc contains neither files, nor data or any other meaningful signals. When you format a disc you simply lay down some basic control information that enables DOS Plus to identify areas of the disc quickly. It needs this information so that it knows where to save files and where to look when you want to retrieve them. The disc format also gives DOS Plus the basic information it needs to create and maintain a catalogue (or directory) of your files.
Different operating systems, and different makes of computer running the same operating system all format discs in slightly different ways. DOS Plus accepts discs that are formatted either under the DOS or CP/M operating systems, as explained in Chapter 1.
Once a disc has been formatted the operating system then verifies it to confirm that the process has been carried out correctly. Hard discs and floppy discs must all be formatted before they are used. Once formatted, a disc can be used indefinitely without reformatting.
Caution:Formatting a disc destroys any information already on the disc. Remember too that a disc can have only one format at any one time. You cannot, for example, have a disc containing a mixture of BBC-formatted files and DOS formatted files. |
DOS Plus allows you to format blank discs as either DOS or CP/M discs by using the DISK command.
To use DISK, load DOS Plus as explained in Chapter 2 and type
A>DISK RETURN
When the menu screen appears press RETURN to select the option.
Press RETURN again to format on drive B, or use the cursor keys to choose drive A.
This produces a new screen with several different choices for disc formats. Generally you will be using the Acorn-type formats, which prepare discs suitable for use on the Master 512. (The remaining options allow you to prepare discs in formats used on machines other than the BBC Master 512).
The first option in the list:
is designed mainly for copying the DOS Plus boot disc. The one you will use most of the time is the next one:
You might also use one of the other options
if you have a Z80 second processor running CP/M.
The choice of format depends on what you will be using the formatted disc for.
Having decided which format you need, use the cursor keys or the spacebar to select the appropriate formatting option.
Press RETURN and then follow the on-screen directions.
Once formatted, the disc is automatically verified.
3.3 Copying discs
DOS Plus allows you to copy discs. A typical use for this is to make a backup copy of a disc as a safeguard against disc failure or accidental damage. You will see later (Chapter 4) that DOS Plus also allows you to copy individual files or groups of files.
To copy the contents of an existing disc onto a new blank disc, you must first format it as described in the previous section. (Note that the format chosen should be the same as that of the existing disc.) You then use the DISK command again
A>DISK RETURN
and select the option by using the cursor keys or the spacebar. Then follow the on-screen instructions.
3.4 Formatting and copying from within applications
Some commercial applications that run on DOS Plus allow you to format discs and make backup copies from within the application. Note that the procedures may be different from those outlined here and you should refer to the manufacturers' documentation in each case.
3.5 Organising your discs
Once your discs are formatted correctly you can use them with your chosen applications. However, if you will be storing a large number of files on disc, you may find it helpful to organise your disc in some way, so that files can be stored within a logical structure.
Under DOS Plus you can store files in directories (similar to the catalogues in the BBC format). DOS has two types of directory: root directories and subdirectories, and it is by using these that you can create a logical file structure. The root directory can be a master directory with as many levels of subdirectory beneath it as you wish. Using these directories you can find and store files easily and efficiently.
For example, suppose three users, Tom, Dick and Barry, are writing memos, reports and letters, and storing them all on the same disc. They might want a directory structure with two levels of subdirectory such as that outlined below.
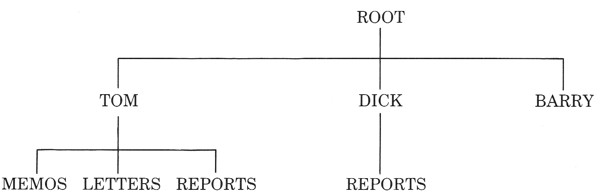 |
Tom files all his memos, letters and reports in separate subdirectories. Dick keeps his reports in one subdirectory and everything else in the subdirectory DICK. Barry hasn't bothered to separate his work out and he stores all his different text files in the one subdirectory called BARRY. It is extremely difficult to keep track of the contents of files once they are on disc. You are advised in your own interests to use the subdirectory facility.
Files such as address lists that Tom, Dick and Barry may need to use are usually kept in the root directory.
3.5.1 Creating a directory structure: the MKDIR command
You can easily create a directory structure under DOS Plus by using the MKDIR command. MKDIR creates as many subdirectories as you like, and you can create directories whenever you like, so that your filing system grows with the contents of the disc. (Note that there are limits to the number of subdirectories you may have, but you are unlikely to reach these in normal disc use).
MKDIR commands are all of the following form:
A>MKDIR {drive}<path to new directory>\directory name
So, to create subdirectory TOM in the above example you would need to type:
A>MKDIR \TOM RETURN
where \ stands for the root directory. To create MEMOS as a subdirectory of TOM you need to specify the location of the new subdirectory in relation to \ (the root) and TOM. So you would type:
A>MKDIR \TOM\MEMOS RETURN
In this case the path from the root directory to the new directory is ROOT–TOM–MEMOS and the DOS Plus syntax for that path is \TOM\MEMOS
Similarly, to create Tom's subdirectory LETTERS, type:
A>MKDIR \TOM\LETTERS RETURN
Tom's directory structure is then completed by creating his REPORTS sub-directory:
A>MKDIR \TOM\REPORTS RETURN
Dick's subdirectory structure is created in the same way:
A>MKDIR \DICK RETURN
(this creates DICK as a root directory of the subdirectory)
A>MKDIR \DICK\REPORTS RETURN
(this creates REPORTS as a DICK's subdirectory)
3.5.2 Displaying a directory structure: the TREE command
The TREE command displays all the subdirectories on a specified disc. Example:
A>TREE b: RETURN
displays the directory structure of the disc in drive B. If you don't specify a drive, TREE displays the subdirectories in the default drive.
3.5.3 Using Subdirectories: the CHDIR and PATH commands
Each time you try to access a file, DOS Plus looks for it in the root directory, unless you specify otherwise. The root directory is the 'current' directory at the beginning of each DOS Plus session.
However, if you are using a directory structure, most of your files will be in subdirectories rather than the root directory. If you want DOS Plus to look in a specified subdirectory, rather than in the root directory use the CHDIR command.
The CHDIR command
CHDIR changes the current directory, so that DOS Plus looks for a file in your specified subdirectory rather than in the root directory. That directory remains the current directory until you change it with another CHDIR command or finish your DOS Plus session.
You can use CHDIR in a similar way to MKDIR, and specify the path from the root directory to the subdirectory. For instance, in our example, if Dick wants his REPORTS directory to be the default directory, he can type:
A>CHDIR \DICK\REPORTS RETURN
and DOS Plus will access files on his REPORTS directory (and nowhere else) until he specifies another subdirectory to be the default directory.
The PATH command
Sometimes it's useful to tell DOS Plus to look for a file in several subdirectories. You can do this with the PATH command. After you've set a PATH command, DOS Plus will look for a file first in the current directory, and then in the list of subdirectories you specified in the PATH command.
Note
PATH only works for executable files (programs) with CMD, COM, EXE, or BAT filetypes. For other files (such as text files), DOS Plus will only look in the current directory.
For example:
A>PATH \TOM\REPORTS;\DICK\REPORTS;\BARRY;B:\ RETURN
This will cause DOS Plus to look first on the current directory (whatever that is) and then in TOM's REPORTS directory. It will then go to DICK'S REPORTS directory and then to directory BARRY. Finally it will go to the root directory in Drive B. Note that
- each directory in the PATH list is separated by semicolons in the PATH command and
- PATH will search drives other than the default drive. To display the current PATH setting simply type:
A>PATH RETURN
To cancel the current PATH setting type:
A>PATH; RETURN
If no PATH is set, or the PATH setting is cancelled, DOS Plus will only look for a file on the current directory.
3.5.4 Deleting Directories: the RMDIR command
RMDIR removes a subdirectory from the specified disc. Before using RMDIR you must remove any files that are in the subdirectory.
Note:
DOS Plus creates two files on each subdirectory for its own use; one is called '.' and the other '..'. These can't be removed and you can ignore them.
Example: provided all files have been removed from the subdirectory MEMOS, the following command removes it from the disc
A>RMDIR \TOM\MEMOS RETURN